|
"My interest is in the future because I am going to spend the rest of my life there."
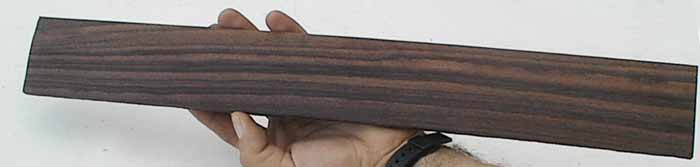
My first choice for the wood I was going to use for my fret board was ebony. If there ever was a wood that's black, it's ebony. It's very hard and the fact that it's black makes the inlays look nice. Unfortunately, I was not able to find any here. I did manage to find some Jacaranda wood (pictured below) which is also very hard and turned out to be quite beautiful.
The piece I got was a little thicker than 1/4". At this point I needed to get it real flat.
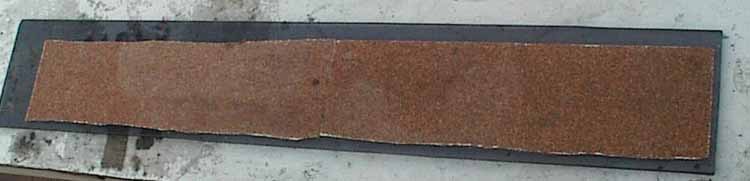
I got a piece of thick glass for a real flat surface and glued (with contact cement) some 80 grit sandpaper to it.
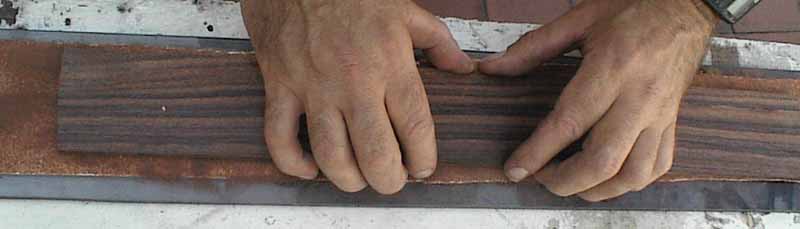
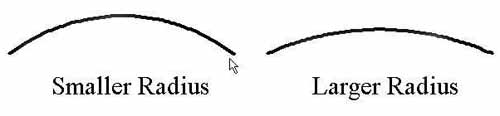
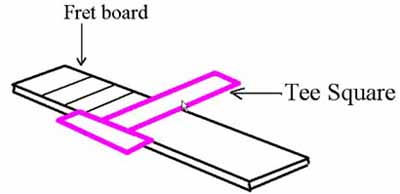
With 2 hands I then went back and forth with the fret board on the flat sanding surface. I would then check it for flatness periodically by placing a metal ruler on the surface and looking towards a light source. When you can't see any light pass through between the ruler and the wood, you know it's flat. When I finished flattening both surfaces I got it to be about 1/4" thick. At this point the width and the length of the fret board is rough cut. Although the fret board will eventually be wider on one end you need to make sure at this point that the fret board is perfectly square as this is necessary to accurately draw where the frets will go with a T square. Compound Radius Most electric and steel string acoustic guitars have a curved fret board to make it easier to play bar chords. The amount of curve is measured by the radius of the curve. Most Gibson fret boards have a radius of 12 inches along the whole fret board. I decided that I wanted to create what they call a compound radius. This is where the curve of the fret board is more extreme at the nut end and as it reaches the bridge end of the fret board it is less curved or flatter. This makes it easier to play chords at the nut end but easier to do riffs further up the neck without it fretting out as you bend the strings. An example of a compound radius is to start at the nut end with a radius of 10" and then finish up the neck with a 16" radius. That seemed a little extreme for my liking so I made it 10" at the nut end and 14" at the bridge end.
Laying Out Where the Frets Go I wanted to make the string length scale Gibson standard. (24-11/16" treble side, 24- 13/16" bass side) There are 3 ways to do this. One is to get a chart and carefully measure each fret. Two is to get a computer program for plotting out the fret board and three is to simply use an already existing fret board as a template. I chose the third method.
Here shows how I used a T square to draw with a sharp pencil the lines where the frets will go. I used fine sandpaper to get the pencil real sharp. Note that at this point it is important that the fret board is a perfect rectangle in order to get the frets nice and square. Afterwards, I then cut the fret board to the correct tapered size. I used the same sanding surface to flatten the edges until it reached the correct width. It's important that the edges are nice and square, so I got a block of wood that I know was square and used it to prop the fret board on it's edge as a rubbed it back and forth on the sandpaper surface. I made my fret board 1 - 9/16" wide on the nut end and 2 - 3/16 at the bridge end. This is also accounting for the fact that it's going to have a plastic binding on the edges which will make the fret board slightly wider. C utting the Fret Slots
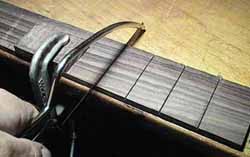
There are a few different methods for putting in frets and they all work good when done properly. It is possible to make it fit just right as not to need any glue to hold them in. I personally like the fit to be just snug enough to stay in then I also put a little bit of super glue in there for added security. If the frets are too loose to stay in themselves you can glue them in with epoxy glue. It's good not to make the fit too tight as this will actually compress the neck causing it to warp backwards. Some people do this purposely to correct a problem of too much forward bow. Dressing the Frets This article is not meant to be a detailed manual on how to do these things so there will be many missing factors in this document. I'm just trying to show you some of the unconventional methods that I used. If you have any questions please let me know. After getting all the frets in and trimming and filing the ends I got a long piece of thick glass and glued fine sandpaper to it. I used #280 grit sandpaper for metal. I then stroked back and forth on the fret until all the frets were just touched by the sandpaper. The idea is to do this as little as possible but just until all the frets have been touched. If the former preparations were done well, you will take very little off. I used sandpaper on the glass but you can use a "large flat file". Be sure that if you use a file for this, it is truly flat.
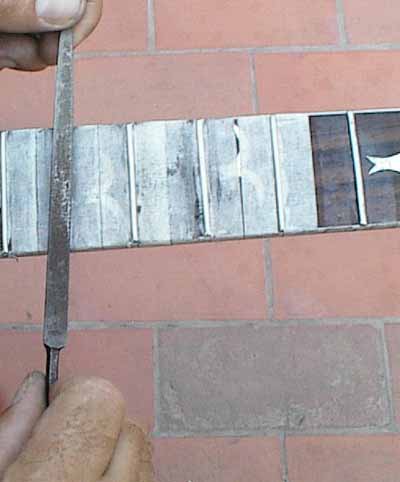
After the tops of the frets have been slightly flattened they need to be re-crowned so they are round again. One essential tool that I didn't have is a special concave file to crown the tops of the frets. This tools is ideal and will help you do a good job. I had to use the old method using a triangular file to file the frets round. I ground the edges or corners of the file to prevent the sharp edges from cutting into the fret board. I covered the fret board area with masking tape to help protect it. Using a triangular file can be quite tedious as it is critical that you do a good job. After filing the frets I then sanded them with #600 grit sand paper, then I went to #1000 grit. If the frets are not well polished the strings will abrasively rub against them when played.
Making the Nut
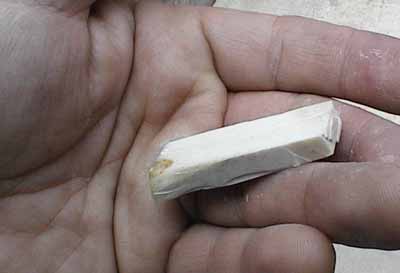
As I continue on in my project of building a Les Paul the "HARD WAY", I decided to make my own nut out of bone. I went to the butchers to get a large dog bone. (Not a bone from a dog but a bone from a cow.) It has to be big because the wall of the bone needs to be thick. I personally like the sound of bone for a guitar nut. After cleaning it up good, I used my cut off wheel from my Dremel drill to cut it up. You can use a hack saw if you like. While using the high speed Dremel to cut it up it was probably the worse smell I have ever experienced. It was kind of like cremation or something. It took about a day for the awful smell to leave the room. I then shaped it with a grinder, file, and sand paper. |